Divi is one of the most versatile WordPress themes, allowing you to create stunning websites with ease. However, to truly personalize your layouts, adding custom CSS can elevate your designs beyond the standard options. In this guide, you’ll learn the steps to efficiently implement custom CSS into your Divi layouts, enhancing their unique appeal and functionality.
Whether you’re aiming for subtle modifications or bold transformations, mastering CSS in Divi will give you the control you need to let your creativity shine.
Key Takeaways:
- Utilize the Divi Theme Options: You can easily add custom CSS by navigating to the Divi Theme Options and inserting your styles in the Custom CSS box.
- Use the Page Settings: For page-specific customizations, access the Page Settings and enter your CSS in the Advanced tab under the Custom CSS section.
- Target Specific Elements: Ensure to use the correct CSS selectors to apply your styles to specific Divi modules or elements for better precision and effectiveness.
Understanding Custom CSS in Divi
A fundamental aspect of creating and customizing your Divi layouts is understanding the role of CSS. CSS, or Cascading Style Sheets, controls the visual presentation of your web content.
In Divi, you have the ability to add custom CSS directly to your layouts, allowing you to create tailored styles that fit your brand and aesthetic. We will examine into the specifics of what custom CSS is and how it can elevate your design capabilities within the Divi framework.
What is Custom CSS?
Custom CSS refers to the ability to write your own styles to override or enhance the default styling provided by Divi.
By entering your own CSS, you can precisely target elements within your layout, ensuring that every aspect—from colors to spacing—aligns with your vision.
This level of customization opens up a world of possibilities, allowing you to transform standard design elements into unique features that showcase your brand identity.
Benefits of Using Custom CSS
What’s more, the benefits of using custom CSS in your Divi layouts are manifold. First and foremost, it grants you greater control over design elements, enabling you to implement advanced styling that isn’t achievable through the standard settings.
This includes fine-tuning margins, paddings, font sizes, and even hover effects, thereby creating a more interactive and visually appealing website. Additionally, custom CSS allows for a consistent visual language across all your pages, reinforcing brand identity and user experience. Another notable advantage of custom CSS is its potential for enhancing site performance.
By selectively applying styles to specific elements, you can help streamline the overall CSS load, which can lead to faster page loading times.
This not only improves user experience but also has positive implications for your website’s SEO. Since a well-styled and efficient website keeps users engaged longer, it can contribute to higher search rankings and increased traffic.
How to Access the Divi Theme Options
Some of the most powerful features for customizing your Divi layout lie within the Divi Theme Options. These options allow you to tweak your site’s appearance without the need for complex coding.
To get the most out of your customization experience, you’ll want to familiarize yourself with how to navigate the Theme Options and find the Custom CSS panel.
Moreover, if you’re interested in utilizing Divi’s built-in capabilities, you might find it helpful to check out this article on How to use Divi’s Built-in Custom CSS Inputs for Advanced ….
Navigating to the Theme Options
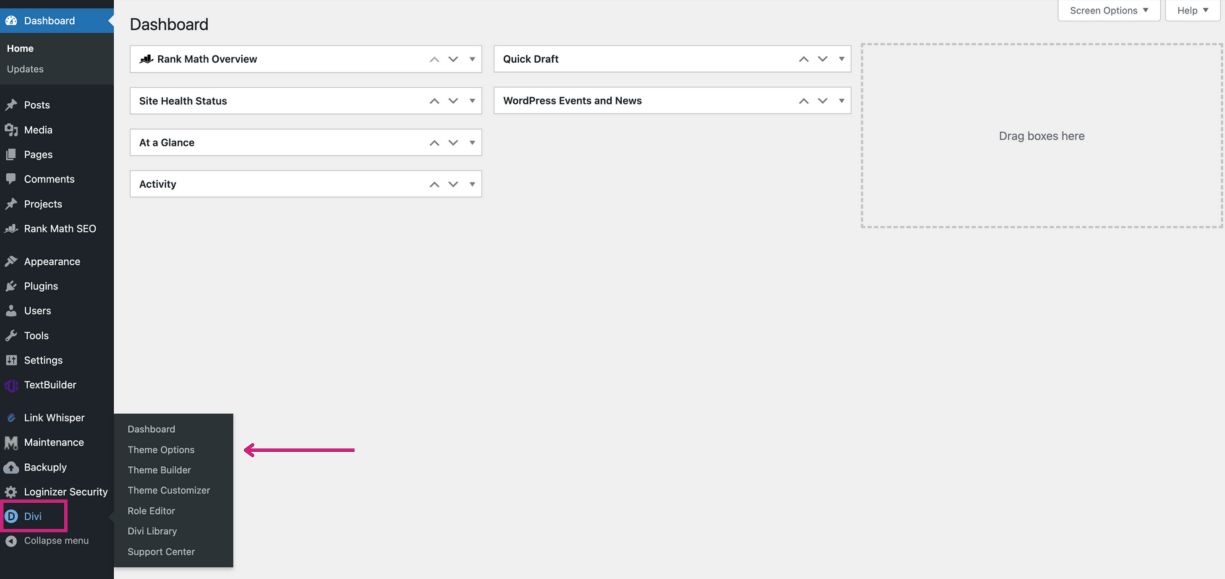
Now, when you want to access the Divi Theme Options, you can do so easily from your WordPress dashboard. Simply navigate to the ‘Divi’ menu item located on the left sidebar of your admin panel. From there, click on ‘Theme Options’ to open the settings interface.
Here, you’ll find a variety of tabs that allow you to customize your site’s overall look and feel. Spend some time familiarizing yourself with each tab, as they can significantly enhance your design capabilities.

Finding the Custom CSS Panel
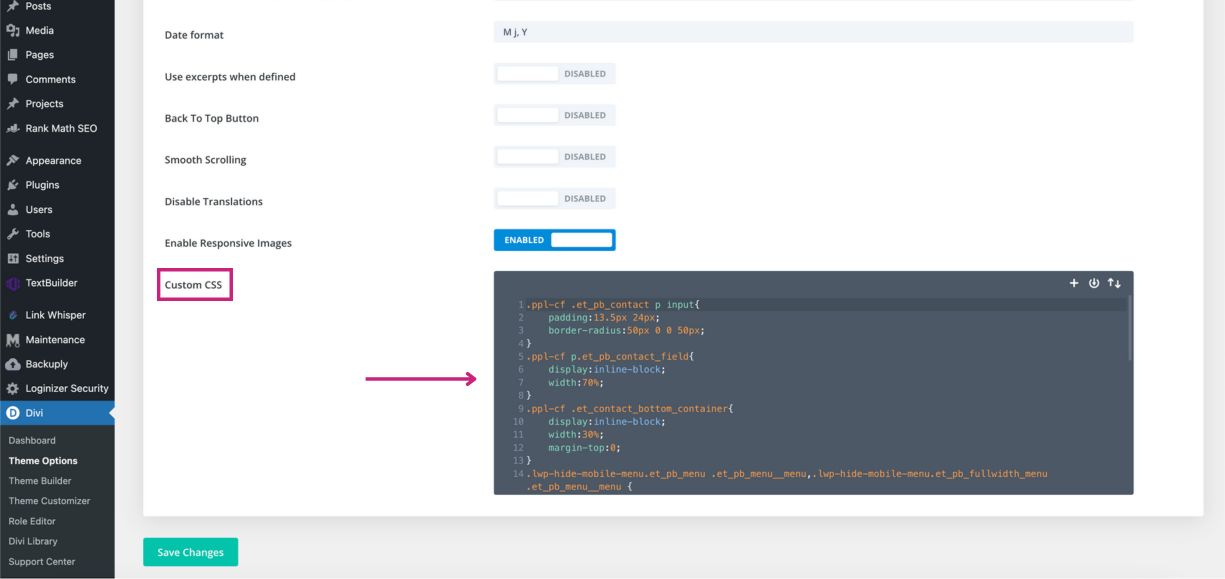
On the Theme Options page, scroll until you see the ‘General’ tab. Within this tab, you’ll find the ‘Custom CSS’ section where you can add your own styles that will apply site-wide.
This space is invaluable, as it lets you implement CSS rules that override existing styles and integrate seamlessly into your Divi layout.
Adding custom CSS in this area can drastically change the aesthetics of your site, ensuring that it stands out precisely as you envision.
Navigating through the Divi Theme Options and locating the Custom CSS panel is a straightforward process that empowers you to personalize your site significantly.
By understanding where to input your custom styles and how they affect your layout, you can create a cohesive and visually pleasing design that resonates with your audience.
Always remember to save your changes and preview them on the front end for the best results!
Adding Custom CSS to Your Divi Layout
After you’ve configured your Divi layout, you may want to take it a step further by adding custom CSS to style your site according to your unique branding or preferences.
Custom CSS allows you to tweak designs beyond the standard options provided by Divi, giving you the opportunity to create a distinctive user experience.
There are several methods you can use to add custom CSS to your layout, and it’s imperative to choose the one that best aligns with your needs.
Applying CSS in the Theme Options
Even if you’re not a coding expert, Divi makes it easy for you to apply custom CSS directly through the Theme Options panel.
You can navigate to your WordPress dashboard and then go to Divi > Theme Options. Under the ‘General’ tab, you’ll find a ‘Custom CSS’ box where you can add any CSS you wish.
This method is handy for site-wide CSS changes, as the styles you enter here will be applied to your entire site. This centralized location makes it straightforward to manage your styles. It’s wise to separate your CSS carefully, allowing for better organization and easier updates in the future.
Whenever you make changes to this area, don’t forget to save your settings to see the effect on your site.

Using the Divi Builder
With the Divi Builder, you have a user-friendly interface that allows for extensive customization options, including adding your custom CSS for individual sections, rows, or modules.
When you enable the Divi Builder on a specific page, you can access the settings for each respective element, where you have the option to add CSS classes or IDs that link to your custom styles.
This granularity gives you control over how specific elements appear, making it easier to tailor your layout according to your design vision.
Another significant advantage of using the Divi Builder is the live preview feature. As you add your custom CSS, you can see real-time updates on your page, allowing you to make adjustments immediately.
This instant feedback enhances your workflow, ensuring that the changes you implement reflect your desired outcome without the need for constant switching between tabs.
Adding CSS to Specific Modules
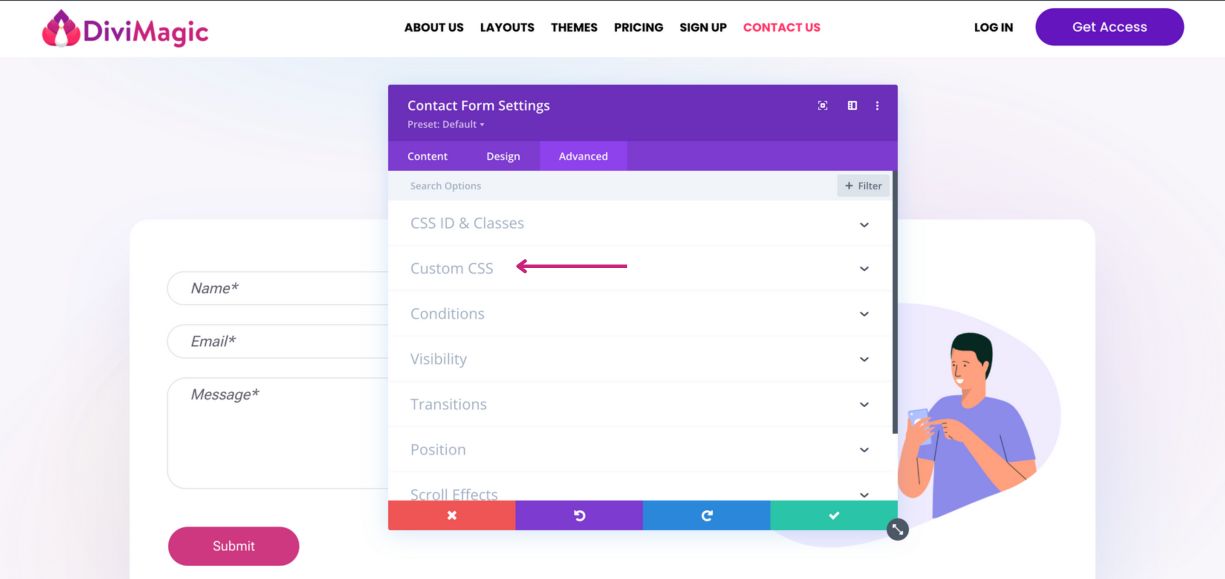
If you want to target specific modules within your layout, Divi makes this particularly easy. Each module comes with a settings option where you can apply custom CSS. To do this, simply select the module you wish to edit and navigate to the ‘Advanced’ tab.
Here, you will find dedicated fields where you can enter custom CSS for that specific module, ensuring that your styles are precise and efficient.
This module-specific customization is particularly useful if you’re looking to highlight certain aspects of your design, such as emphasizing a call-to-action button or changing the typography for a single text module.
By applying CSS at this level, you can achieve a refined look while avoiding broader style changes that could affect other parts of your layout.
To leverage this feature effectively, it’s beneficial to be familiar with basic CSS principles. This enables you to create more sophisticated and targeted styles, enhancing the overall aesthetic and functionality of your website. As you explore this area, don’t hesitate to experiment with different styles to discover what works best for your Divi layout.


Tips for Effective Custom CSS
Many people often overlook the importance of following best practices when adding custom CSS to a Divi layout. Implementing effective CSS not only enhances the visual appeal of your site but also improves its maintainability and performance. To help you succeed in your efforts, here are some tips to keep in mind:
- Always use specific selectors to avoid conflicts with existing styles.
- Comment your code to make future edits easier to understand.
- Use external stylesheets for larger projects to create a cleaner code base.
- Consider mobile responsiveness when styling your layout.
- Regularly test your changes in different browsers and devices.
Thou should prioritize clarity and readability in your CSS to make troubleshooting less daunting.
Best Practices for Writing CSS
To write effective CSS, you should always strive for clarity and organization in your code. Start by structuring your styles logically, grouping related properties together, which makes it easier to read and modify.
Use meaningful class names that reflect the function of the elements you’re styling to ensure that you or anyone else working on the project can understand the intentions behind your CSS.
Additionally, avoid using inline styles as they can clutter your HTML and make your CSS harder to manage.
Instead, opt for external stylesheets and link those to your Divi layout. This approach allows for cleaner code management and enables site-wide changes from a single stylesheet, improving your workflow significantly.
Testing Your CSS Changes
Practices like testing your CSS changes regularly can save you from future headaches. Always check how your custom styles perform across various devices and browsers to ensure a consistent experience for all users.
Consider using developer tools in your browser to inspect elements and quickly adjust styles in real-time.
This method gives you immediate visual feedback that can drastically improve the iteration process.
Plus, always keep a backup of your original CSS before making significant changes. This precaution allows you to revert back if something goes wrong, making your experimentation with custom styles less risky and more effective.
Common CSS Mistakes to Avoid
Assuming that your custom CSS will work perfectly without proper testing is a common pitfall. It’s easy to overlook nuances such as browser compatibility, the cascading nature of styles, or specificity conflicts.
Always remember to scrutinize your code thoroughly and run tests to catch issues early on, before they impact your site’s functionality or appearance. Writing CSS, while seemingly straightforward, can lead to complications if you fall into the trap of vague selectors or excessive use of `!important`.
These practices can make further styling cumbersome and difficult to maintain. Keep your CSS clean and maintainable by adhering to best practices, ensuring a more seamless design experience in Divi layouts.
To Wrap Up
Hence, implementing custom CSS in your Divi layout not only enhances your website’s appearance but also provides the flexibility needed to personalize your design effectively.
By utilizing the built-in options within the Divi Builder, you can easily apply custom CSS globally or to specific modules, allowing you to tailor your website to meet your specific needs.
Remember to utilize the inspector tool in your web browser to determine which elements you wish to style and test your changes systematically to ensure everything appears as expected. Additionally, you should always keep a backup of your custom CSS codes and regularly review them as you update your site’s design.
Incorporating custom CSS into your Divi layout elevates not just the aesthetics but also the user experience, ultimately contributing to a more engaging and professional presentation of your content. By following these guidelines, you will position yourself well to create unique Divi sites that stand out among the competition.

FAQ
Q: How can I add custom CSS to a Divi layout?
A: To add custom CSS to a Divi layout, you can follow these steps: 1. Open your WordPress dashboard and go to the page or post where you want to add custom CSS. 2. Click on the “Enable Divi Builder” button if you haven’t already done so. 3. Once in the Divi Builder, you can either add your CSS globally or to specific modules. To add it to a specific module, click on the module settings (gear icon), then go to the “Advanced” tab and find the “Custom CSS” section where you can enter your CSS code. 4. For global CSS that affects the entire site, go to “Divi” in your WordPress dashboard, select “Theme Options,” and under the “General” tab, you’ll find a field called “Custom CSS.” Paste your CSS code there and save changes. 5. Lastly, make sure to preview your changes and clear any caching if necessary to see the effects.
Q: Can I use custom CSS to modify the appearance of specific elements in my Divi layout?
A: Yes, you can use custom CSS to target specific elements in your Divi layout. To do this, you should use CSS classes or IDs to select the elements you want to modify. 1. You can assign a custom class or ID to any module by going into the module settings and navigating to the “Advanced” tab. There you’ll find fields for “CSS ID” and “CSS Class.” 2. Once you’ve assigned your class or ID, you can write your custom CSS in the “Custom CSS” section of the module settings, or globally in the “Custom CSS” area in the Theme Options. 3. For example, if you assign a class “custom-header” to a header module, you can style it further in your CSS with the rule `.custom-header { color: red; font-size: 24px; }` which would change the text color to red and the font size to 24 pixels. Remember to clear your site cache to see the changes.
Q: Where should I place my CSS to ensure it doesn’t get overwritten by future updates?
A: To ensure that your custom CSS doesn’t get overwritten by future updates to the Divi theme, it’s best to add it in one of the following locations: 1. Use the “Additional CSS” feature found under “Appearance” > “Customize” in your WordPress dashboard. This area is safe from theme updates. 2. Alternatively, consider utilizing a child theme if you plan to make extensive customizations. You can create a child theme and place your custom CSS in the `style.css` file of your child theme. This way, your modifications remain intact even if the parent theme is updated. 3. Additionally, using a plugin designed for custom CSS management can also safeguard your styles. Plugins like “Simple Custom CSS” or “CSS Hero” allow you to manage your customizations without affecting theme files directly. Always remember to back up your site before making significant changes.

